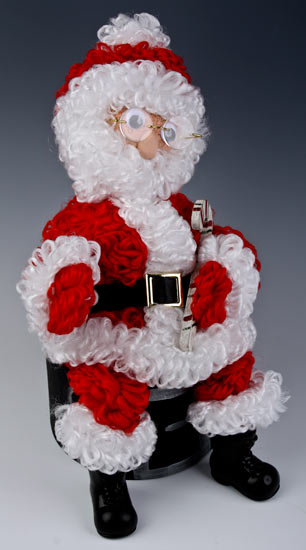
Things you need:
White Jumbo Loopy Chenille
Black Jumbo Loopy Chenille
Red Jumbo Loopy Chenille
5″ Styrofoam Ball
3-1/2″ Styrofoam Ball
2″ x 3″ Styrofoam Cone
2-3/4″ Oval Glasses
2 – Black Vinyl Santa Belt
7/8″ Mini Unfinished Wooden Eggs
2 – 20mm Googly Eyes
English Lace Apple Barrel Acrylic Paint
Floral U Pins
Things to do:
1. To start off take the 3-1/2″ styrofoam ball and paint it with the English lace paint. Now take the 5″ styrofoam ball and glue it to the bottom of the 3-1/2″. Glue the styrofoam cone on top of the 3-1/2″ ball to create the body of Santa.
2. Take the red loopy chenille and pin it to the top of the cone and start wrapping it around the cone. Make sure its tight and glue the end of loopy chenille or just pin it down. Take the red loopy again and start to cover the whole styrofoam ball that is going to be used for the body. pin the ends and make sure its tight, If wanting to, glue some spots to keep in place.
3. Now take the white loopy and pin it right underneath the red loopy that is around the cone for the hat. This white loopy is going to be the start of the brim of hat. Going to take the white loopy and wrap around the back again and once it gets to side of ball, pin it down to stay in place, then take the white loopy and aim it down a bit, take across face again (Make sure there is enough of the tan styrofoam ball showing to put Santa’s face). Keep on wrapping around the face until it gets to bottom and covering everything up. Take a 16″ piece of white loopy and wrap around the neck of Santa and twist the end and bring down the middle of the body-pin in place and any extra just cut off.
4. Take a 24″ piece of the white loopy and wrap around the bottom of the 5″ styrofoam ball, glue and pin in place. Take 4 pieces of the red loopy that is going to be a foot long. With all 4 pieces, fold in half and twist ends together, this is going to create the arms and legs for snowman. Pin arms to the body of snowman, make sure its kind of in the back a bit and pin into the section where both the styrofoam balls meet up. The reminding 2 are going to be used for the feet, pin into the bottom side of the 5″ styrofoam ball.
5. Using the black loopy cut 2 pieces that are about 5″ long fold in half, twist ends together, then wrap ends onto the end of the red loopy used for the legs. Glue to keep in place. Take 4 pieces of the white loopy that are going to be 6″ long. Using one of the 6″ pieces, wrap around to make a circle and connect the ends, then slide onto one of the arms. Repeat with the 3 reminding pieces and slide onto the the last arm and both legs
6. Grab one of the belts and cut it in the back (because we are going to have to cut about 5″ off the second belt). Glue the belt around the body of the Santa, have the ends in back. Once you have cut 5 inches off the second belt, bring to the back of Santa to connect with the belt that’s glued on. There is going to be some that is over lapping, fold the ends that are over lapping and pin into the piece you cut off of second belt then pin into the body.
7. Using the 7/8″ mini egg, cut in half and paint with the English lace paint, which is going to be used for the nose. Let dry. Glue the pair of googly eyes onto the face and then glue the nose underneath the eyes. Once eyes and nose are glued, grab the oval glasses and stick into styrofoam ball, make sure they match up with the eyes.
8. Lastly, take a 3″ piece of the white loopy and wrap into a ball pin and glue to the top of the cone for the finishing touch to the hat.
