Things you need:
1 – 1-1/2″ Unfinished Wood Block
1 – 2″ Unfinished Wood Block
1 – 2-1/2″ Unfinished Wood Block
2 – Unfinished Wood Mitten Buttons
1 – 3/8″ Jingle Bell
3 – 1″ Rusty Tin Primitive Stars
1 – Down Home Brown Antiquing Medium
1 – Ivory Apple Barrel Acrylic Paint
1 – Black Apple Barrel Paint
1 – Harvest Orange Apple Barrel Paint
1 – Goose Feather Apple Barrel Paint (Color is optional… this is used for the gloves)
1 – Weldbond Universal Adhesive Glue
Double Spring Side Cutter Pliers
Paint Brushes
3ply Jute
Black Craft Wire
Infants Small White Knit Sock
Things to do:
1. Take your paint brushes and paint each unfinished wood block with your ivory Apple Barrel acrylic paint.
2. Next take your Goose Feather Apple Barrel paint and paint your unfinished wood mitten buttons. Remember that is this an optional color and you can choose the color if you do not wish to paint it red.
3. Once the unfinished wood blocks and unfinished wood mitten buttons are dried you can then brush on the Down Home Brown antiquing medium. Rub off the antiquing medium to give an old aged look to the wood blocks and unfinished wood mitten buttons.
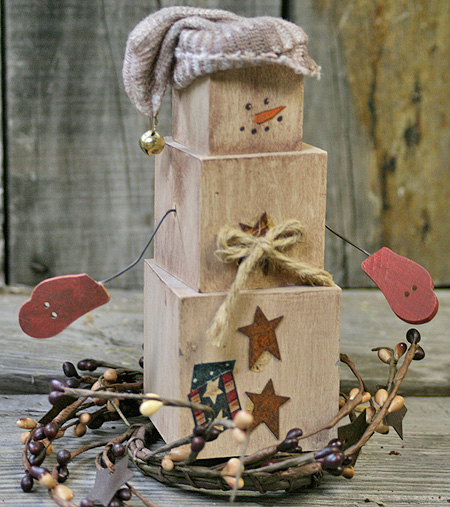
4. After the unfinished wood blocks have dried you can then use the Weldbond Universal adhesive glue to glue the unfinished wood blocks together to form the body of the snowman.
5. Take a screw and form a hole on each side of the middle unfinished wood block where the “arms” will be attached.
6. Cut two 2-1/4″ sections of the black craft wire with your double spring side cutter pliers. Use the Weldbond Universal adhesive glue to attach the unfinished wood mitten buttons to the sections of the black craft wire.
7. Then insert the black craft wire arms into the holes you have drilled on the body (place a dab of glue in these holes).
8. Now use the glue to glue the three rusty tin primitive stars down the front of the snowman body to form buttons.
9. Take the 3ply jute and cut a 6″ piece. Tie the small section of the 3ply jute into a bow. Trim the loose ends of the 3ply jute bow to the size you need and use the glue to the front of the top rusty tin primitive star button.
10. Use the ivory, black and Harvest Orange Apple Barrel acrylic paint to paint on the snowman face.
11. To make the hat take an infants small white knit sock and grubby the sock with the Down Home Brown antiquing medium. When the sock hat has dried attach the 3/8″ Jingle Bell. Slip the hat onto the top of the block head snowman. Complete by adding your own personal touches.

