
Search results
80 results found.
80 results found.
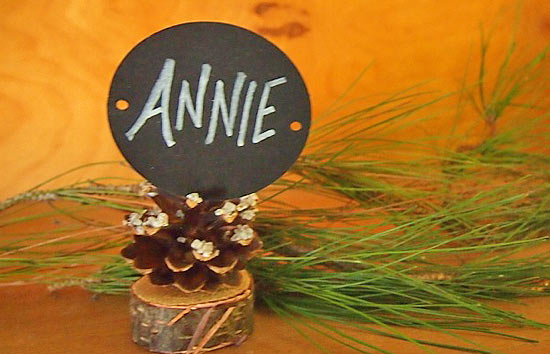
Let your guests know where to sit in style! This placeholder adds the perfect rustic touch to your dinner party, bringing a touch of the woods indoors.
Difficulty level: Beginner
Time to complete: 20 Minutes
Age range: 10 and Up
Things you’ll need:
Small Wood Slice
Small Pinecone
Hot glue gun and glue sticks
Mod Podge
Small Paintbrush
Epsom Salts
Chalkboard circles
Chalk Pen
Things to do:
1. First, use hot glue to attach the pinecone to the small log slice. Let the hot glue dry.

2. Next, we’re going to cover the tips of the pinecone with Epsom salts. Apply a generous amount of mod podge to the tips using a paintbrush and sprinkle Epsom salts. Allow time to dry. Repeat this step until all of the tips have been covered.


3. The final step is writing on a chalk circle. Once you’ve written your guest’s name, slide the circle into the top of the pinecone.
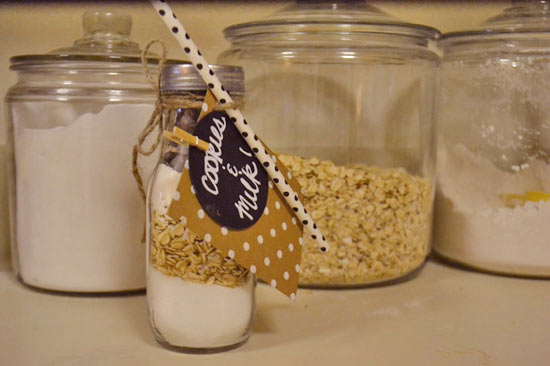
Every year, my family goes Christmas caroling. We like to take small gifts with us to give out at the houses we stop at. This darling gift is a wonderful DIY to have on hand during the holiday season. Your friends will love receiving such a thoughtful, homemade present. It’s a great way to show you care, without breaking the bank.
Difficulty level: Beginner
Time to complete: 15 Minutes
Age range: 8 and Up
Things you’ll need:
Old fashion milk jar
Paper Straws
Cardstock
Chalk circles
Mini clothespins
Jute
Chalk Pen
Scissors
Ruler
Hole punch
Things to do:
1. The first step is cutting out your recipe card. I chose to write my recipe on a piece of cardstock that matched my paper straw. This non-traditional recipe card is durable and super cute! Use a ruler to cut out a 4 inch by 3 inch rectangle and write your favorite recipe for cookies on the back. Punch a hole in the top corner of the recipe card.


2. The next step is decorating the milk bottle. Cut a piece of jute that is long enough to wrap around the top of the bottle several times. Once the jute is attached to the milk bottle, tie on the recipe card and a paper straw. Finish the decoration with a nice bow.
3. Use your chalk ink pen to write Cookies and Milk” on a chalk circle. Attach this adorable detail with a mini clothespin.
4. Complete your project by adding dry ingredients to the bottle. I included oatmeal, chocolate chips, flour, and sugar. This makes the milk bottle look super cute and makes it easy for the recipient to bake a batch of homemade cookies!