
Search results
58 results found.
58 results found.
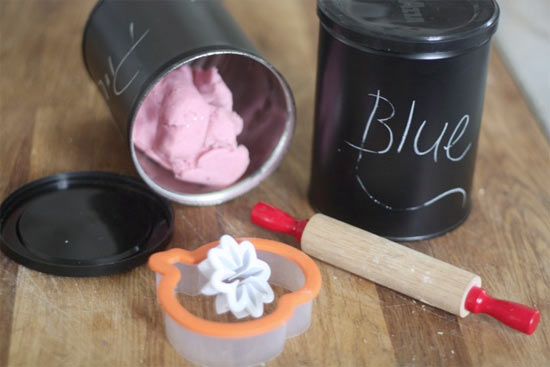
We make a lot of homemade playdough at our house. After years of trial and error, we’ve found the absolute best recipe, it’s even better than the store bought version and we always have the ingredients on had to make it. However, I find that storing it can be difficult. Baggies work well for a while but tend to get holes leaving you with dried up dough. Tupperware is great but sometimes the lids are hard to remove for little hands. The best option? Coffee cans! They are the perfect size for a 1/2 batch of dough with plenty of room for a few cutters in the can a well and they seal perfectly. The only downside? Well, they aren’t the cutest things, are they? Enter chalkboard paint. This is a simple way of dressing up old coffee cans and as an added bonus you can write the color of the contents inside right on the jar. New color? No problem, just erase and re-write!
Things you’ll need:
Coffee Cans
Chalkboard Spray Paint
Newsprint
Things to do:
1. Wash and dry your cans, making sure all coffee is removed and that there are no sharp edges inside the can (Sand a bit if there are)
2. Turn the cans upside down on the newsprint and spray all over with three coats of paint, allowing each to dry in between layers.
3. Allow the paint to harden for 24 hours before using the cans, then load them up and play away!
Playdough recipe:
1 c. flour
2T cream of tarter
1T vegetable oil
1/2 cup kosher salt
Mix all ingredients in a large bowl and then add 1 cup of boiling water. You can add food coloring to the water to add color to your dough. Stir until well blended and then turn out onto a floured work surface, knead in more flour until the dough is cool and is no longer sticky.
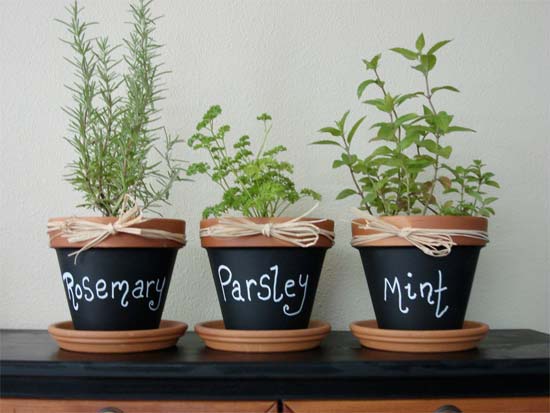
Photo Credits: The Robin’s Nest
Don’t let your flower garden go to pot by settling for drab, unadorned terracotta planters! With so many fun and creative ideas to spice them up, you’ll never have to lay eyes on dreary, rough textured pots again. Here are a few decorating tips that will give these old stand-bys a fresh status in your home or garden:
Decoupage Pots
Greeting cards, empty seed packets, wrapping paper, wall paper, and pages from gardening magazines are all fun decoupage medium choices. To make, cut or tear out the images you want to use and adhere to the pot with Outdoor Mod Podge.
Embellished Pots
Create a salvaged treasure masterpiece using shells, bottle caps, marbles, buttons, checkers, rocks, acorn caps, pennies, or rhinestones. To make, paint the pot with 2-3 coats of Apple Barrel Acrylic Paint, thoroughly drying between each coat. Next, use a glue gun to affix embellishments. For added interest and dimension, overlap pieces slightly or arrange in intriguing patterns.
Wrapped Pots
Natural elements, such as tree bark and raffia, add rustic charm to terracotta pots, and look especially striking when paired with lush tropical foliage or delicate blossoms. To make these nature-inspired wrapped pots, use a glue gun and generous amounts of glue, overlapping pieces as you wrap. (Tip: Flexible bark, such as birch, works best.)
Painted Pots
The sky’s the limit when it comes to creating painted pot works of art. Paint pots with 2-3 coats of Apple Barrel Acrylic Paint, and then add stripes, stencil designs, or whatever else you can think up. To provide hands-on fun for pint-sized gardeners, paint pots with chalkboard paint and then let the budding Picassos add their own chalk drawn masterpieces.
With a little time and creativity, you’ll soon have a stash of terracotta pots well worthy of the most beautiful blossoms and lush foliage. Even with no green thumb in sight, it’s easy and affordable to have a beautiful flower garden.