
Search results
208 results found.
208 results found.
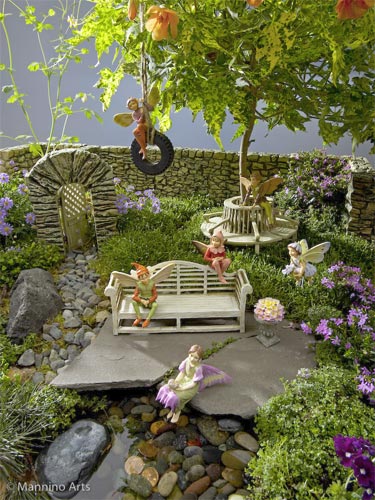
Whether you’re rekindling a childhood love of fairy tales and fairies, or you want to ignite a passion for fantasy worlds with children and grandchildren, an enchanted fairy garden is sure to delight. With a little imagination, creativity, and a healthy dose of belief in the make-believe, it will be a cinch to transform a garden space into a magical fairy paradise. Here are a few basic steps to get you started:
Choosing your Magical Fairy Garden Location
Protect diminutive plants and dainty fairy miniatures and accessories from the elements by nestling your enchanted garden against a rock wall, tree stump or trunk, rock outcropping, or a stationary garden structure, such as a bird bath or garden statue. If you live in an apartment or condo or prefer to have your fairy garden indoors, any plant container can easily be transformed into an enchanted garden.
Designing your Enchanted Fairy Garden
Before you begin, consider which type of fairy will inhabit your enchanted garden. If you’ll be catering to woodland fairies, you’ll want to have strips of tree bark, river rock, moss-covered rocks, and twigs on hand. If you’ll be accommodating flower fairies, gather smooth rocks for meandering flower garden walkways, and a miniature fence or stone flower border.
All fairies need a cozy abode, so be sure to include a fairy house in your enchanted garden. You can purchase a pre-made miniature fairy house or build your own from the ground up. Another option is to modify pre-made doll houses by covering them with bark, moss, leaves, or dried flowers and berries.
Choosing Plants for your Enchanted Space
While you’ll need to be mindful of the challenges of your gardening zone and location (shade, full sun, or dappled sunlight) when choosing your plants, below is a listing of fairy favorites:
– Wooly thyme
– Ornamental strawberries
– Irish moss
– Blue Star Creeper
– Cranesbill
– Rosemary
– Calendula
– Brass buttons
– Roses
Fairies love most any flower, especially those with vibrantly colored petals and climbing plants, such as clematis. For an especially enchanting fairy garden, plant clematis along a garden obelisk. Fairies also have a passion for trees, and are especially fond of willow, oak, Rowan, apple, ash, cedar, and pine species.
Enjoy your Enchanted Garden
Now, sit back and soak up the enchanted environment you’ve created. Surround the garden with flat sitting rocks, and gather around for fairy picnics” of miniature sandwiches and petit fours, or enjoy sharing a refreshing beverage served in delicate demitasse cups. Enchanted gardens are also ideal reading spots, so have volumes of your favorite fairy tales and legends of wee folks close by.
With a fairy garden, you can have a magical world of faraway places right in your own backyard. Enjoy unleashing your imagination and sharing this magical environment with family and friends.

Looking for a crafty way to organize coupons, receipts, and bills? Want to declare your refrigerator door a magnet-free zone? Put an end to the clutter, while keeping your important paperwork and most treasured masterpieces close by, with this easy to make organizational display board.
Things you need:
Board (sized to suit your space)
Enough fabric or decorative paper to cover face and edges of board
Poly Foam Sponge Brush
Mod Podge
Jumbo Clothespins
Coordinating fabric or paper to cover clothespin fronts
Embellishments such as ribbon, buttons, or rhinestones
Glue Gun and Glue Sticks
Scissors
Sawtooth Hangers
Things to do:
1. Clean board thoroughly and remove all surface dirt and dust, then apply a generous, even layer of Mod Podge.
2. Lay your fabric or paper atop the Mod Podge coated board, and then smooth the surface with a plastic card or rubber-tipped spatula to press out any bubbles.
3. Cut square notches from the fabric at each corner, then apply Mod Podge to the edge of the board and fold fabric over to create a tidy edge.
4. Apply a coat of Mod Podge to the surface and sides, and allow to thoroughly dry.
5. Use this same technique to apply fabric to the front of the clothes pins.
6. When dry, use hot glue to affix the clothes pins to the board. Add the picture hanger to the back of the board, and let the decluttering begin!
Personalize with a clothespin for every member of your family. Use this organizational display board as a messaging center for permission slips, lunch money, or chore lists, or hang it above your desk as a not-so-subtle-but-oh-so-pretty reminder of tasks yet to be completed. Ideal for home use, this nifty craft also makes a great gift for teachers, busy moms, or anyone with a space that’s calling for a touch of organization.