
Search results
208 results found.
208 results found.
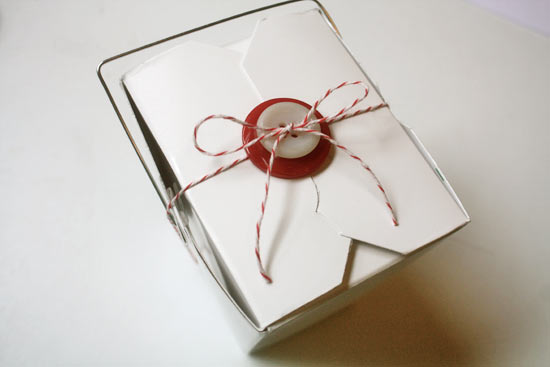
Sometimes, what you really need is a quick and easy way to make a gift look like you put a lot of thought and effort into the wrapping. This cute trick is easy and quick to execute but looks dynamite on a plain box or simply wrapped gift. Look for buttons that coordinate with your bakers twine for the best pop of fun!
Difficulty level: Easy
Time required: Less than 5 minutes
Things you’ll need:
Buttons in two colors and sizes
Baker’s twine
Gift box
Scissors
Things to do:
1. Cut a length of string long enough to go around your package plus an additional 10 inches.

2. Wrap the twine around the gift with the ends coming to the top of the package and thread the ends through two of the holes on each button so that the buttons nestle on top of one another (with the smallest on top).

3. Push the buttons down so that they are tight against the box, pulling the string taut as you go.

4. Tie a firm knot and then a neat bow on top of the buttons. Trim the ends as needed.

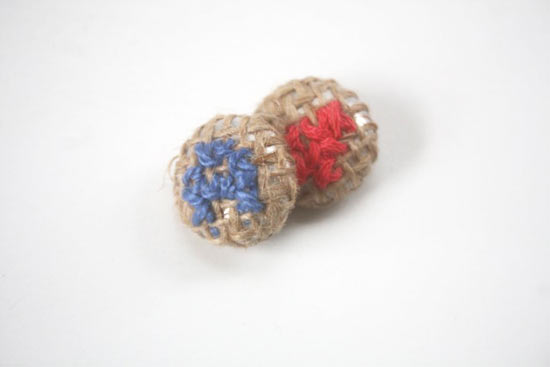
I’m a sewer and I love making special outfits for my kids and once they are almost done, I always want the perfect buttons for my creations. For this purpose I love fabric covered buttons and making them more special with a little cross stitching is even better!
Time required: 20 minutes
Difficulty level: Moderate
Things you’ll need:
Burlap fabric
Covered button kit
Embroidery thread
Embroidery needle
Scissors
Things to do:
1. Using the template from your button cover kit, plan out how large your cross stitch can be.

2. Thread your needle and stitch the shape you want onto the fabric.

3. Cut the fabric into a circle using the template.

4. Assemble the button as per the instructions on the kit. Optionally you can add a piece of solid colored fabric under the burlap to create a backdrop to the burlap before you assemble the button.