
Search results
25 results found.
25 results found.
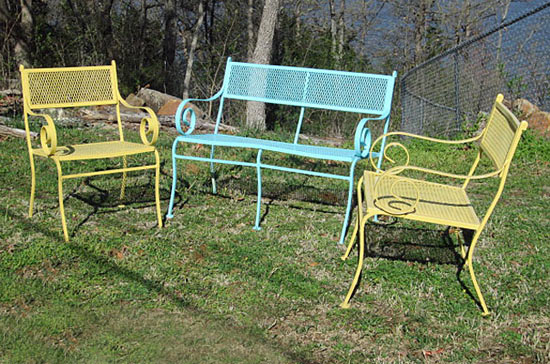
Have you been to a yard or rummage sale and seen cool wire patio furniture that has seen better days? Have you priced new patio furniture that is bland, soulless, and expensive?
Take a chance, spend the $25, and spend a day creating the patio furniture of your dreams with this relatively simple craft. A little effort, a little imagination, and a little elbow grease will give you the fundamentals to help you create your own unique outdoor environment.
Age range: Adults
Time to complete: 4 hours (over several days)
Difficulty level: Intermediate (must use power tools!)
Things you’ll need:
Tired, nasty wire patio furniture
Spray paint formulated for metal/outdoor, any color
Power drill with wire brushes
Manual wire brush
Safety glasses
Paper mask
Soap/water, scrub brush
Dry paint brush
Things to do:
1. Hunt Craigslist, garage sales, and rummage sales to find your furniture. Look for pieces with personality. Ensure that any rust is superficial, that it doesn’t compromise the integrity of the furniture. Bargain! If the owner wanted, they could update their own furniture! They’re trying to sell the stuff so they can buy new. And they think you’re nuts for paying good money for their nasty old furniture! Negotiate price, overload car and roof, and bring it home.


2. Wash furniture with soap, water, and a scrub brush to remove spiders, dirt, and rust. Please remember to wear your safety glasses!
Use a stiff brush to remove as much dirt as possible. Use a small wire brush to remove visible rust and obviously flaking paint.

3. Let the furniture dry completely. Bright sunshine works great!
4. Now for the fun. Put on the safety glasses and mask, attach a wire brush to your power drill, and start removing paint and rust in earnest! Go slow and take your time. Let the drill and brush do the work, you don’t need to push too hard. The surface will look terrible, but you aren’t trying to get all of the paint, you just want the surface smooth. Work in small areas; finish one before you start the next or this will take forever! Every now and then use the dry brush to clean the piece to check progress. You can stretch this part out over many days if you want!

5. Once the furniture is smooth and the dirt is gone, you’re ready for the most fun and satisfying part, painting!
6. Shake your spray paint well, put on your mask, and start applying paint according to the manufacturer’s instructions. Spray a thin layer over a large area instead of a lot on a small area. Keep your paint can moving. Overspray, don’t stop at the edge, spray past it for best coverage. Once everything is painted, let it sit and dry completely. Repeat these steps and apply another thin coat. Let it dry. If everything looks good, you can stop. If not, add one more coat.

7. Let the piece dry completely, and then dry some more.


8. Place your furniture, add pillows, and enjoy!

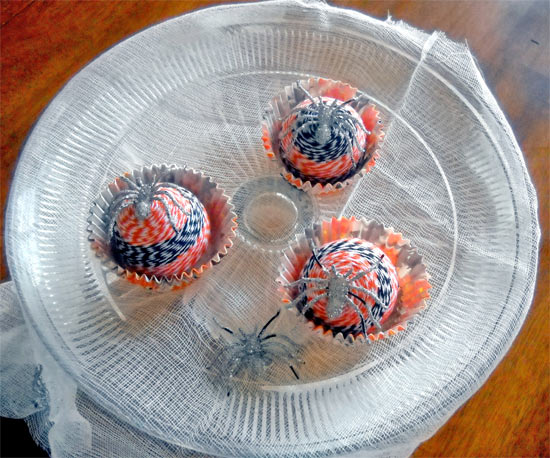
Now that the air feels cooler and it is getting darker earlier the fall season is upon us, and has put me in the mood for a little Halloween and fall decorating! For today’s post I’m going to show you how to make a fun trick not treat decor for your kitchen or to place on your dinning room table.
Things you’ll need:
Bakers Twine: (mandarin orange and charcoal black were used here )
Halloween Cupcake Liners
2″ Styrofoam balls
Spiders
Cheese cloth (optional)
Things do do:
1. Cut a sliver of each Styrofoam ball to make one side flat.
2. Using your hot glue gun put a dot of glue on the top of one of your balls and begin wrapping your first twine in a circle, keeping it tight and close together so that the white on the Styrofoam ball does not show through. Continue to add little dots of glue as you go around and around to keep it in place.
3.When you are ready use your scissors to cut your first twine and switch the twines you are using to give you a pattern. Make sure to add glue where the first twine leaves off and the second one begins. Then wrap the second twine around the ball as you did your first twine. ( You could also just use one twine color for each of your cupcakes” it is totally up to you!)

4. Once you have wrapped your twine around each of your Styrofoam balls, take your cupcake holders ( I opted to keep three cupcake holders together for each cupcake” for a more sturdier base ) and adding a touch of hot glue to the inside bottom place the flat side of your ball on top.
5. You can now attach your spiders where you like it with more glue, and your cupcakes are complete!
6. For a spookier look you can dress up your serving platter with cheese cloth and more spiders.
Thanks so much for stopping by and I hope you have fun making your tricks not treats!
Lisa from Lisa’s Creative Niche