Skip to search Skip to navigation menu Skip to main content Selecting option will reload page

Category: Kid's Arts and Crafts

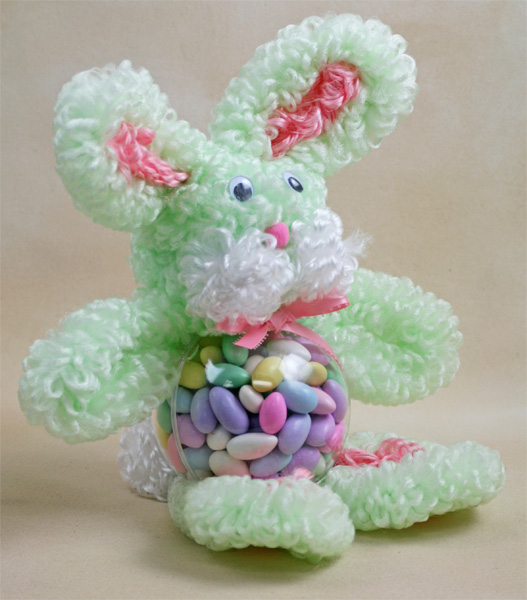
Craft Project – Loopy Chenille Bunny Candy Holder

bunny_candy_holder_loopy_chenille
Loopy chenille is great for projects. Loopy chenille is soft and plush like with wire so that you are able bend and form as you please. This loopy chenille bunny candy holder is super easy to make and can be used for more than just candy. This loopy chenille bunny would be perfect for a gift from the Easter bunny or you could even use this bunny for a baby shower!
Things You’ll Need:
1 Hank – Mint Jumbo Loopy Chenille (or color of your choice)
1 Hank – Pink Jumbo Loopy Chenille
1 Hank – White Jumbo Loopy Chenille
2 – 15mm Googly Eyes
1 – 3/4″ Pink Pom Pom
1 – 3″ Styrofoam Ball
1 – 110mm Acrylic Ball Fillable Ornament
Floral U Pins
Hot Glue Gun
Glue Gun Sticks

Things to Do:
1. Begin by wrapping the styrofoam ball with the mint loopy chenille. Secure the loopy chenille with floral u pins.
2. Cut two-9″ strips from the mint loopy chenille. Fold the two loopy chenille strips in half and secure to the top of the head for ears.
3. Cut two-3″ strips from the pink loopy chenille for the inside of the bunny’s ear. Secure the pink loopy chenille with hot glue.
4. Cut two-3″ strips from the white loopy chenille. Wind the white loopy chenille strips in a circle for the muzzle. Glue the white loopy chenille muzzle onto the bunny head.
5. Glue on the pink pom pom for the nose and glue on the googly eyes.
6. Fill the acrylic ball ornament with candy or whatever else you may have in mind for this bunny holder. ***You may need to secure the acrylic fillable ball ornament with a small amount of hot glue on the sides if you fill it up or if the candy is heavy.
6. Next, cut two-11″ strips from the mint loopy chenille. Fold the two loopy chenille strips in half and glue to the bottom of the acrylic fillable ball ornament for the bunny’s feet. Cut two-4″ strips from the pink loopy chenille for the inside of the bunny’s feet. Secure the pink loopy chenille with hot glue.
7. Finally, cut two-9″ strips from the mint loopy chenille and fold them in half for the bunny’s arms. Secure the loopy chenille arms to the acrylic fillable ball ornament with hot glue.
Continue Reading

It’s a Hoot! Felt Owls from Styrofoam Balls

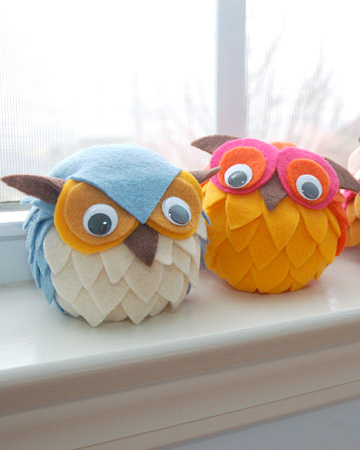
felt_owlsInspired from Your Best Handmade Creations” on Martha Stewart and Not Just a Mommy, these chubby felt owls are a hoot and easy to make after all the cutting! These felt owls could be made around the colors of your themed party. You could use pastels or gender specific colors for a baby shower. You could also choose specific colors for a birthday or even a holiday such as Valentine’s Day!

Things you need:
2 – 4″ Styrofoam Balls
4 – 25mm Googly Eyes
Felt sheets – colors of your choice
Glue Gun and Glue Sticks
Owl One Template
Owl Two Template

Things to do for Owl One:
1. Flatten your styrofoam ball by gently pressing against a table’s surface. This will be helpful later, to keep the owl from rolling.
2. Print out the Owl One Template. Cut out each piece. Begin by tracing and cutting out your feathers (this is number 3 in the owl one template) from your felt squares. You may want to cut out two different colors of feathers, depending on the owl you may have in mind. Glue the felt feathers onto the styrofoam ball, starting from the bottom and go up. Stagger and glue on the feathers on top of one another until you have almost reached the the top of the styrofoam ball. Since owl two does not have a head covering, cover the entire styrofoam ball with feathers. One color should be used for the front of the owl and the other color should be used as the backside of the owl.
3. To make owl one’s face cut out shapes 1, 2, and 5 from the owl one template in felt of your choice. To make the beak of the owl, cut a feather out of brown felt. Place and glue the small eye piece (#2) onto the larger eye piece (#1). Glue on the googly eyes and brown felt feather nose with a dab of hot glue. Next, glue the cone shape (#5) over the glued felt eye pieces. Be sure that the point of the felt cone is aligned with the middle of the eyes as pictured. Do not round off the corners of the felt cone yet. This will come later.
4. To make the ears of the owl, trace and cut out two triangles (#4) from brown felt. Pinch the two corners of the brown felt triangles and hot glue together. Here comes the tricky part of putting together your owl… you have to glue the felt ears onto the styrofoam body first. You will have to figure out the placement of the owl’s face, then glue on the ears. After you have glued on the ears, hot glue the front of the face onto the styrofoam body. Gently wrap the remaining part of the felt cone shape around the styrofoam ball and round out the corners as needed before gluing.

Things to do for Owl Two:
1. Flatten your styrofoam ball by gently pressing against a table’s surface. This will be helpful later, to keep the owl from rolling.
2. Print out Owl Two Template. Cut out each piece. Begin by tracing and cutting out your feathers (this is number 3 in the owl two template) from your felt squares. You may want to cut out two different colors of feathers, depending on the owl you may have in mind. Glue the felt feathers onto the styrofoam ball, starting from the bottom and go up. Stagger and glue on the feathers on top of one another. Since owl two does not have a head covering, cover the entire styrofoam ball with feathers. One color should be used for the front of the owl and the other color should be used as the backside of the owl.
3. To make the eyes for your owl, cut out two of the large circles (#1) and cut two of the smaller circles (#2) from felt of your choice. Glue the smaller circles on top of the larger circles once you like the placement. Then hot glue the two googly eyes onto the smaller circles. Cut a brown feather (#3) for the beak.
4. To make the ears of the owl, trace and cut out two triangles (#4) from brown felt. Pinch the two corners of the brown felt triangles and hot glue together. Place and glue the ears onto the owl. This will be your guide for the rest of the owl’s face. Place and glue the beak onto the owl. Finally, glue on the eyes with hot glue.

Photo Credits: Your Best Handmade Creations

Continue Reading
Change Your Country
Please select your country, this will change the site to your country's currency:

Cancel