Skip to search Skip to navigation menu Skip to main content Selecting option will reload page

Cookie Cutter Favors and Ornaments

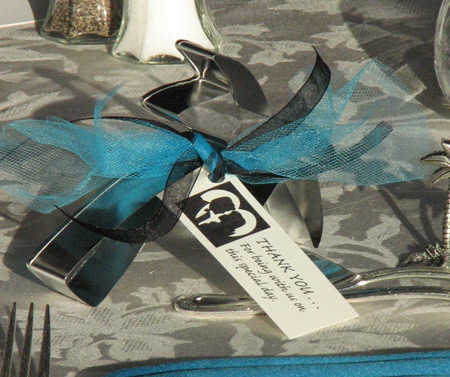
metal_palm_tree_cookie_cutter_size_5h_1
Cookie cutters are the new “in” thing for weddings and parties such as baby showers. They are inexpensive and easy to personalize. You can turn ordinary cookie cutters into ornaments, party favors, place cards, and more! cookie cutters come in a variety of shapes and sizes. You just simply match the cookie cutters to the event or holiday.

You can attach ribbon, raffia or twine depending on the theme to make holiday ornaments and leave them as they are or you could make more of a unique ornament. To make more of an unique ornament you can use color paper or different designs and styles or even use your own photos! You can use patterned paper such as scrapbooking paper or old photos and glue them onto heavy card stock. Trace the paper or photo with the cookie cutter of your choice. You then use some glue and dab along the edge of the cookie cutter and press the paper or photo onto the cookie cutter. Let dry. After cookie cutter is dry, carefully thread a ribbon between the cookie cutter and the paper. Finally knot the ends of the ribbon and you have your finished personalized ornament! This would also be a fun project for the kids. They could add their own embellishments such as glitter and bells.

For favors and place cards you can tie tags with cute sayings that fit the event or even tie on special recipes for your guest to enjoy when they take them home!
For baby shower cookie cutter favor ideas:
Use a baby bottle cookie cutter and attach a tag with “Bottles and booties, diapers and pins, this is where the love begins!”
Use a bear cookie cutter and attach a tag with “We can “bearly” wait for the new baby to arrive…” or “We can “bearly” keep it a secret…”
Use a baby rattle cookie cutter and attach a tag with “Diaper pins and bottles, Rattles and bows, These are the little things that our new baby brings”
For themed wedding cookie cutter favors ideas:
Use heart shaped cookie cutters and attach tags with “Our Heart-Felt Thanks for Sharing our Special Day with Us” or “True love holds with gentle hands. The hearts that it entwines. “
Use any western themed cookie cutter such as a cowboy boot, cowboy hat, or longhorn and attach a tag with “Jus’ Hitched!”
Use a shell cookie cutter for a beach wedding and attach a tag “Our love “shell” last forever!”
Continue Reading

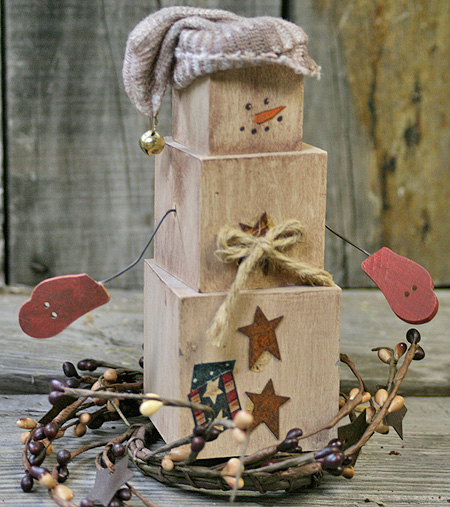
DIY Primitive Snowman Shelf Sitter

primitive_snowman_wood_blocks

Things you need:
1 – 1-1/2″ Unfinished Wood Block
1 – 2″ Unfinished Wood Block
1 – 2-1/2″ Unfinished Wood Block
2 – Unfinished Wood Mitten Buttons
1 – 3/8″ Jingle Bell
3 – 1″ Rusty Tin Primitive Stars
1 – Down Home Brown Antiquing Medium
1 – Ivory Apple Barrel Acrylic Paint
1 – Black Apple Barrel Paint
1 – Harvest Orange Apple Barrel Paint
1 – Goose Feather Apple Barrel Paint (Color is optional… this is used for the gloves)
1 – Weldbond Universal Adhesive Glue
Double Spring Side Cutter Pliers
Paint Brushes
3ply Jute
Black Craft Wire
Infants Small White Knit Sock

Things to do:
1. Take your paint brushes and paint each unfinished wood block with your ivory Apple Barrel acrylic paint.
2. Next take your Goose Feather Apple Barrel paint and paint your unfinished wood mitten buttons. Remember that is this an optional color and you can choose the color if you do not wish to paint it red.
3. Once the unfinished wood blocks and unfinished wood mitten buttons are dried you can then brush on the Down Home Brown antiquing medium. Rub off the antiquing medium to give an old aged look to the wood blocks and unfinished wood mitten buttons.
4. After the unfinished wood blocks have dried you can then use the Weldbond Universal adhesive glue to glue the unfinished wood blocks together to form the body of the snowman.
5. Take a screw and form a hole on each side of the middle unfinished wood block where the “arms” will be attached.
6. Cut two 2-1/4″ sections of the black craft wire with your double spring side cutter pliers. Use the Weldbond Universal adhesive glue to attach the unfinished wood mitten buttons to the sections of the black craft wire.
7. Then insert the black craft wire arms into the holes you have drilled on the body (place a dab of glue in these holes).
8. Now use the glue to glue the three rusty tin primitive stars down the front of the snowman body to form buttons.
9. Take the 3ply jute and cut a 6″ piece. Tie the small section of the 3ply jute into a bow. Trim the loose ends of the 3ply jute bow to the size you need and use the glue to the front of the top rusty tin primitive star button.
10. Use the ivory, black and Harvest Orange Apple Barrel acrylic paint to paint on the snowman face.
11. To make the hat take an infants small white knit sock and grubby the sock with the Down Home Brown antiquing medium. When the sock hat has dried attach the 3/8″ Jingle Bell. Slip the hat onto the top of the block head snowman. Complete by adding your own personal touches.

Continue Reading
Change Your Country
Please select your country, this will change the site to your country's currency:

Cancel