Things you need:
1 Hank – White Loopy Chenille
1 Hank – Pink Loopy Chenille
1 Hank – Yellow Loopy Chenille (optional)
1 – 6″ Styrofoam Ball
1 – 3″ Styrofoam Ball
7 – 2″ Styrofoam Eggs
1 – 1/2″ Pink Pom Pom
1 – 5″ Black Felt Top Hat
1 – Craft Stick
2 – 25mm Googly Eyes
2 – 1-1/2″ White Pom Poms
22 gauge White Paddle Floral Wire
Pastel Colored Apple Acrylic Paints
Floral U Pins
Hot Glue Gun
Hot Glue Sticks
Ribbon and Flowers as Desired
Things to do:
1. Paint the 2″ styrofoam eggs each with a pastel Apple Barrel paint. Set them aside and let dry.
2. Gently press the 6″ styrofoam ball against the surface of a table to create a flattened bottom. Place the craft stick halfway down into the top of the styrofoam ball. Press the remaining of the craft stick into the bottom of your 3″ styrofoam ball.
3. Begin wrapping the white loopy chenille around the styrofoam body form. You may want to start from the head down to the body. Be sure that you secure the loopy chenille as you go with floral u pins and hot glue.
4. Cut a 9″ strip of white loopy chenille and curl each end into towards each other, creating the muzzle of the loopy chenille bunny. Secure the loopy chenille muzzle to the bunny’s head with floral u pins and hot glue. You can also try using two – 1-1/2″ white pom poms. Either way would be fine (we used pom poms).
5. Glue on googly eyes and pink pom pom nose above the muzzle with hot glue. Hot glue the felt top hat onto the top of the bunny’s head.
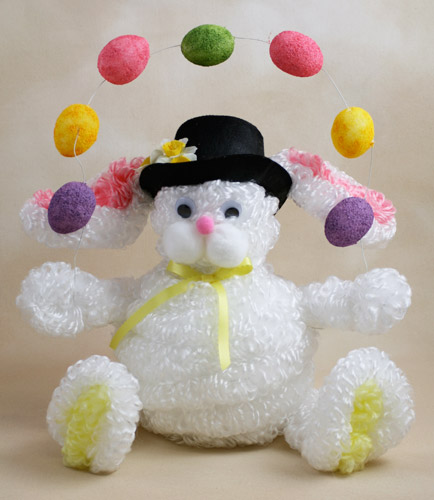
6. Cut two – 12″ strips of the white loopy chenille and two – 9″ strips of pink loopy chenille. Hold one white loopy chenille strip and one pink loopy chenille strip in one hand and line them up. Fold the white loopy chenille strip in half over the pink loopy chenille strip. Repeat this process for the remaining strips. Hot glue each strip together and glue each ear onto the hat. See photo for placement.
7. Cut two – 12″ strips of white loopy chenille to make the bunny’s arms. Fold each white loopy chenille strip in half and attach the arms onto the side of the bunny’s body. Secure with floral pins and hot glue.
8. Cut two – 15″ strips of white loopy chenille to make the bunny’s legs. Fold each loopy chenille strip in half and attach to the bottom sides of the bunny’s body. Secure with floral pins and hot glue. To create feet, slightly twist the ends and fold upward. Here is where you can add the yellow loopy chenille for a little color. Cut two -4″ strips of the yellow loopy chenille and glue inside the feet. This will show as the bunny’s foot padding when sitting upright.
9. Slip each of your painted styrofoam eggs onto the wire, leaving about 2″ of space in between each egg. To make sure the eggs do not slide around. add a dab of hot glue on each end of the egg where the wire meets the egg. Bend the wire so that it creates an arch and attach the ends of the wire to the ends of the bunny’s arms. You may need to add a little hot glue where the eggs or wire meet the ears to add a little more security. Bend the bunny’s paws to hold the wire arch.
10. Finally, adorn your bunny with ribbons and flowers of your choice. Now your bunny is ready to impress with its juggling skills!

4 Comments
where can I buy the chenille loopy? I can’t find it any where HELP!!!
thanks Ginger
The reason you are unable to find loopy chenille is because manufacturer has discontinued this product unfortunately and will no longer be making it. What we have now is all that we have and will be getting http://factorydirectcraft.com/catalog/categories/1302_2533_1364-loopy_chenille.html (If you are wanting any of those colors, I would advice you buy them now because they are going quickly and we are very low on stock.) Our buyers have been looking around everywhere to find what is left out there but unfortunately have not had any luck finding anything. If you have any other questions, please feel free and I will be glad to help 🙂
Very nice, Why cant I print out the instructions on how to make this adorable bunny?
Hello Sandy 🙂 There is no “print” button the blog unfortunately but it is something we will consider for the future. You can always print out any instructions you see by going to “file” on the top left of your computer/browser and click print. That should work for what youre wanting. If you have any other questions, please let me know!