Skip to search Skip to navigation menu Skip to main content Selecting option will reload page

Category: General Crafts

DIY American Mini Pallet Flag Display

This American Mini Pallet Flag Kit is a charming and patriotic decoration featuring miniature wooden pallets painted in the iconic red, white, and blue pattern of the American flag. Perfect for adding a touch of Americana to any space, this kit is ideal for displaying on shelves, desks, or mantelpieces, celebrating American heritage and values in a compact and stylish way.

Difficulty level:Beginner
Time to complete:30 minutes
Age range:12 and up

Things you’ll need:
Unfinished Wood Pallet Panel Sign
1″ Unfinished Wood Stars
4 yd Natural Jute Twine
1-1/2″ Blue Ribbon with Printed White Stars Wired Ribbon
3/8″ Braided Red Jute Ribbon
Bright Red Apple Barrel Acrylic Paint
White Apple Barrel Acrylic Paint
Royal Blue Apple Barrel Paint
Scissors
Pencils
Hot glue gunandglue sticks
Paint Brush

Let’s grab your supplies, channel your inner artist, and let get crafting!

Step 1:

Grab your ruler, pencil, and the wooden pallet. Draw a straight line from top to bottom, about 3-4 inches in from the edge. This will help separate the sections of the ‘flag’.

Step 2:

Here, I chose the red Apple Barrel paint and painted the 1st and the 3rd slat on the side with the horizontal lines on the pallet.

Then i came back in with the White Apple Barrel paint to paint the remaining 2nd and 4th horizontal slats on the pallet.

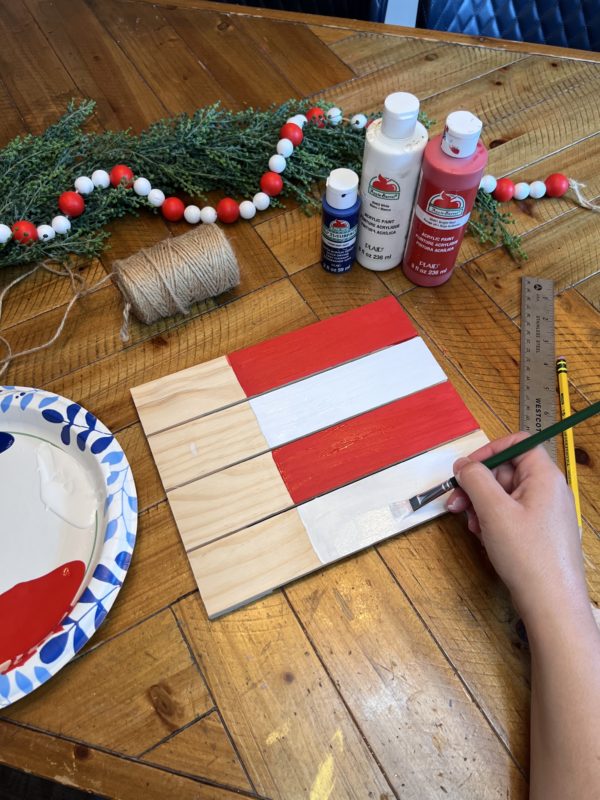
On the left-hand side of the pallet, paint this section with the royal blue Apple Barrel paint.

Step 3:

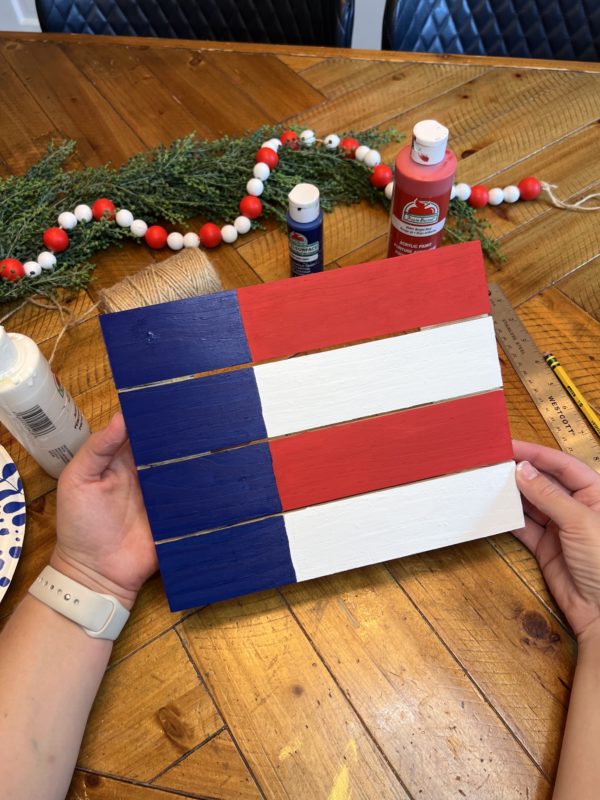
I grabbed our 1 inch unfinished wood star pieces. I laid them out on the blue side of the pallet and hot glued them in place.

I chose not to paint them to give a contrast between the paints. This was also going to tie into the jute twine and raffia that will be placed on later.
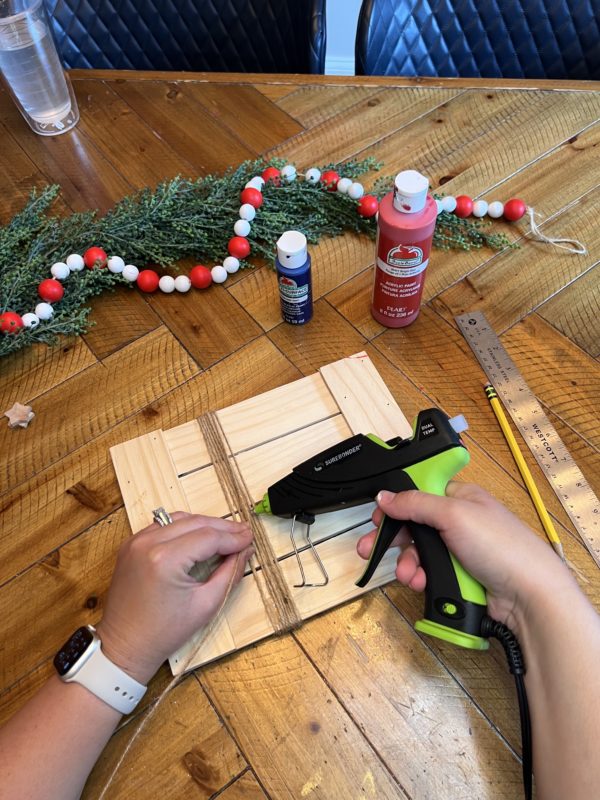
Step 4:

Take the jute twine and hot glue the end on the backside of the pallet. Once dried, start to wrap the twine around the pallet along the line that was drawn at the beginning. I believe i went around 6-8 times.

Hot glue the other end in place on the back side.

Step 5:

Grab your desired ribbon choices. I came in with a red jute ribbon, blue star ribbon and the raffia. I laid them on top of each other and then took some floral wire to hold them together the red and blue ribbon.

You then will take a section of raffia and tie it into a knot. Hot glue on top of the floral wire holding together the grouped ribbon. Once set, hot glue onto your pallet. Then you are finished! It is now ready to place alongside you other patriotic themed decor to help finish off those looks.

Continue Reading

DIY ST. Patrick’s Candy Dispenser Craft

Create your own festive St. Patrick’s Day Candy Machine with this easy and enjoyable DIY craft! Fill with your favorite St. Patrick’s Day sweets and watch as friends and family delight in this whimsical, homemade treat dispenser. It’s a fun project that adds a touch of Irish charm to your celebrations! Great for your desk, offices, and teachers!

Materials Needed:
4″ Clear Acrylic Snow Globe Jar
Small Terra Cotta Flower Pot
5/8″ Black with Gold Edge Satin Ribbon
Shamrock Apple Barrel Acrylic Paint
Unfinished Wood Knobs for Cabinet Furniture Drawer Pull Handles
Four Leaf Clover Shamrocks
Hot glue gun and glue sticks
E6000
Scissors

Let’s grab your supplies, channel your inner artist, and let get crafting!

Step 1: Grab your desired paint color that you wish to be the base color. You will then paint a nice coat covering all of the terra cotta pot. With this being for St. Patrick’s Day, i chose to go with ourShamrock Apple Barrel Acrylic Paint.

You will then grab your ‘snow globe’ jar and take this apart. Take the lid and the insert piece. You will then want to paint this in the same color used for the pot.

  • With this being plastic, the paint was having a hard time sticking. I did not have a primer on hand, so i went to the next best thing – HAIRSPRAY Worked Great!

Once all the paint was dried, i came in with a coat of our Mod Podge to help seal. You can spray again with the hairspray before and after. This will then help give it more security and not peeling!

Step 2: Grab your choice in ribbon. I went with our5/8″ Black with Gold Edge Satin Ribbon. I hot glued this in place alongside the rim of the lid and the insert that was inside the ‘Snow globe’ jar.

Step 3: Grab the insert piece that fit in the opening of the jar. You will want this piece glued onto the bottom of the terra cotta pot. You will glue the insert top against the pot. This will have the concave portion facing upward, which will create a “seat” for the jar to sit on.

  • You will want to apply the multi purpose glue, like E6000 in the center and then with the hot glue gun, apply a circle around this to help hold into place.

Step 4: Grab your globe. Once you are ready, apply a layer of hot glue on the rim of the plastic insert piece that the globe will sit on. Then attach.

With some of the hot glue showing, i came in with some twine and wrapped around about 3 times and tied off. This helped give a ice touch, but also hid that glue.

Step 5: Here you will have the options for a few finishing touches. I wanted to attach a topper to the lid for the globe. So i grabbed our Unfinished Wood Knobs, painted this in the same green and then hot glued in place on top.

We had these adorable shamrock accents, so i glue one right onto the terra cotta pot to give it more of a St. Patrick feel.

Continue Reading
Change Your Country
Please select your country, this will change the site to your country's currency:

Cancel