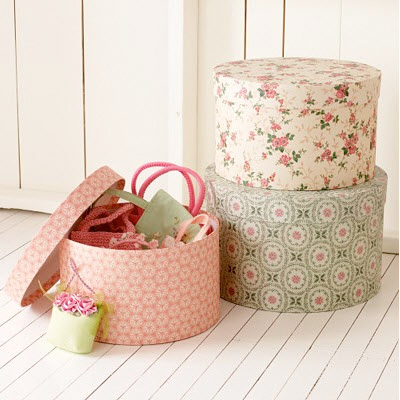
Almost every colonial kitchen contained round wooden nesting boxes, or panty boxes. These boxes were often painted and used for storing spices, grains and flour. In the 19th century, clothing-makers adopted the shape for holding collar bands. Early American wives soon learned that these band boxes made beautiful and convenient storage boxes when covered with decorative wallpapers. Today, antique band boxes are considered a rare and sought-after collector’s item. It’s easy to make your own covered boxes for home storage. You could search in flea markets for vintage wallpapers, use new wallpaper that is made to look vintage, or go completely modern, the choice is yours.
Things you need:
Wallpaper
Round paper mache box
Pencil
Mod Podge
Scissors
Cloth measuring tape
Metal-edge ruler
Hobby knife
Cutting mat
Things to do:
1. Place the paper mache box bottom and the lid on the wrong side of the paper, then lightly trace circles, one for each, with the pencil.
2. For the lid, you will need to draw a 1/2″ margin around the outside of the first pencil line. You can freehand draw the outer circle. It’s not as important that this outer line form a perfect circle as long as the space between the inner and outer circles is approximately 1/2″. Use the scissors to cut out the lid on the outer pencil line. For the bottom piece you will cut just inside the pencil line (no margin is needed).
3. Cut 1/2″ high, narrow triangular notches around the lid piece, space the notches 1/2″ apart.
4. Use the cloth measuring tape to measure both the height and the circumference of the box and the lid. Add 1″ to each dimension, then use your metal ruler and pencil to draw correctly-sized rectangular strips on the wrong side of the wallpaper. (For example, for a height of 3″ and a circumference of 10″ you will draw a rectangular strip that is 4″ high by 11″ long).
5. Use the metal ruler, cutting mat and hobby knife to cut out the rectangular strips.
6. Cut 1/2 high, narrow triangular notches along the long sides, top and bottom, of the box piece and along only the bottom length of the lid piece. Space the notches about 1/2″ apart.
7. To cover the box: Apply Mod Podge to the wrong side of the box strip. Center the box on the strip, between the notches along the top and bottom edges. Carefully smooth the paper down around the box, when you get to the end of the strip, try to find a place where you can match up the print on the paper, folding down the short edge as needed to make the design look seamless. Apply a little more Mod Podge to the folded edge and smooth flat.
8. Fold the notches down along the bottom first, then along the top, smoothing them down with your fingers.
9. Apply Mod Podge to the wrong side of the bottom circle and smooth it onto the bottom of the box, covering the notches.
10. To cover the lid: Apply Mod Podge to the wrong side of the notched round lid piece. Center the lid on it and fold the notches under the inside of the lid. Smooth into place.
11. Take the lid strip and fold the un-notched top edge down 1/2″, creasing it to make a sharp edge. Apply Mod Podge to the inside of the strip, including over the folded edge.
12. Like you did for the box, carefully smooth the paper down around the lid, lining up the folded edge along the top of the lid. Smooth the notched edge to the inside of the lid.
1 Comment
I am so excited…because this is a project that I had been thinking about doing. You have all the directions that I need to proceed with my idea! Thank you!