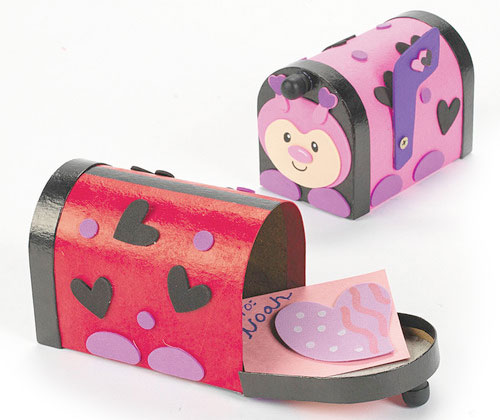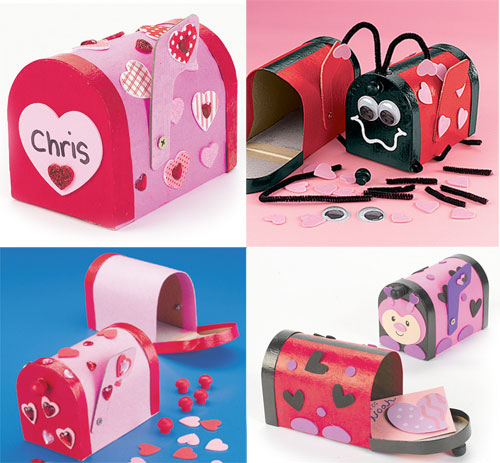
Every Valentines Day, kids can be seen exchanging cards, featuring their favorite cartoon and singer idols or even showing their creative side and making their own. However, what are they to collect them in? Your child can create their own mailbox for all those lovely little love letters! This mailbox is super easy to make and would be perfect for the little ones school parties. These paper mache mailboxes are perfect solution for storing all those Valentines and special treats. Your child can use a variety of items to create their own special and unique Valentines mailbox. Your child can decorate their plain old paper mache mailbox with fun foamie craft items like sport, conversation heart, fun and funky stickers, or heart shaped foamies. You can also use glitter to add a little glitz and glam. You may also want to consider scrapbooking embellishments such as ribbon, tags, and stickers. To help create a critter mailbox you could cut out shapes using foamie sheets, use googly eyes, and even use pipe cleaners for the antennas! Your child can simply paint the mailbox with Apple Barrel acrylic paints of your choice or cover with decorative paper (trace each part of the mailbox, cut and then glue onto the box…with adult supervision of course) and your child can begin creating their master piece!

When working, be sure to let your child let them do the majority of the work. Otherwise, you won’t be able to take pride in what they’ve created. Involving the whole family to help create your child’s mailbox can quickly become a fun night, filled with fun and laughter. You may even want to consider sneaking in your own Valentine in the box before your child heads off to school. Later, they will be reminded how much they are loved. Being loved on Valentine’s Day is cool… even if it is just by your mom!
Craft Project – Loopy Chenille Bunny and Carrot
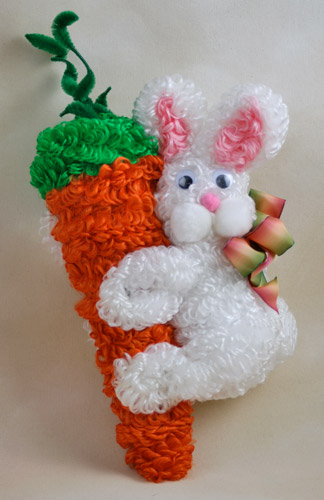
 How cute is this loopy chenille bunny and carrot!? This little loopy chenille bunny is really easy to make and takes no time at all. Loopy chenille adds a plush feel to any project and is intertwined with wire that is easy to bend to create wonderful craft projects.
Things you will need:
1 Hank – White Loopy Chenille
1 Hank – Orange Loopy Chenille
1 Hank – Emerald Green Loopy Chenille
1 Hank – Pink Loopy Chenille
1 – 3″ Styrofoam Egg
1 – 4-3/4″ Styrofoam Egg
1 – 4″ x 12″ Styrofoam Cone
2 – 1-1/2″ White Pom Poms
1 – 1/2″ Pink Pom Pom
2 – 25mm Googly Eyes
1 – Craft Stick
Green Bumpy Pipe Cleaners
Floral U Pins
Hot Glue Gun
Hot Glue Sticks
Ribbon and Flowers as Desired
Things to do:
1. To start your loopy chenille bunny and carrot, we will start making the carrot first. Take the styrofoam cone and wrap the orange loopy chenille around the cone starting at the point and work your way up. Leave about a 1/2″ of cone for the green loopy chenille in the next step. Secure the orange loopy chenille with hot glue and floral pins.
2. Finish the styrofoam cone up with the emerald green loopy chenille, covering the entire top of the styrofoam carrot and secure with floral pins.
3. Place and secure the green bumpy chenille stems where desired on the top of the loopy chenille carrot. Secure with hot glue.
3. To cover up the bumpy chenille stems and to add a little bit more dimension, cut a 6″ strip of emerald green loopy chenille and wind into a circle. Secure to the wide, flat end of the styrofoam cone with floral pins.
4. To start the bunny, cut a 32″ strip of white loopy chenille and wrap the 3″ styrofoam egg. Secure with hot glue and floral pins. Place the craft into the bottom of the head and glue. This will later be used to attach the head to the body.
5. To create the bunny’s body, cut 2 yards of white loopy chenille and wrap around the 4-3/4″ styrofoam egg. Secure the loopy chenille to the styrofoam egg with floral pins and hot glue.
6. Attach the head and body together with a dab of hot glue to the top of the bunny’s body and push the craft stick that is attached to the head through the top of the body. Let cool.
7. To create the bunny’s ears, cut two- 8″ strips of white loopy chenille and fold them in half. Secure to the top of the head with hot glue and floral pins.
8. Cut two- 3″ strips of pink loopy chenille and place in the middle of the white loopy chenille ears. Secure with hot glue.
9. Cut two- 18″ strips of white loopy chenille to make the bunny’s legs. Fold the white loopy chenille strips in half and twist once, creating little bunny feet and legs. Attach the two loopy chenille legs with floral pins towards the bottom of the bunny’s body.
10. Cut another two- 18″ strips from the white loopy chenille to make the bunny’s arms. Fold the white loopy chenille strips in half and twist once, creating bunny paws and arms. Attach the arms with floral pins and hot glue.
11. Glue on googly eyes, the two white pom poms for the muzzle and finally the pink pom pom for the bunny’s nose. Cut a 12″ strip of white loopy chenille and wind the loopy chenille strip into a ball. Attach to the back of the bunny at the bottom for the bunny’s tail with hot glue and floral pins.
12. Add a dab of hot glue here and there on the side of the carrot to attach the bunny, press the bunny against the carrot until the glue has cooled. Secure the arms and legs to the carrot with hot glue and floral pins.
13. Finally, adorn your bunny with ribbon of your choice and attach a ribbon on the top of the carrot to hang your beloved bunny!