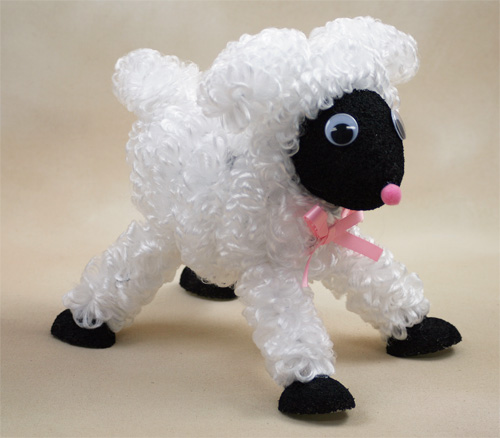
 Check out this loopy chenille lamb! This loopy chenille lamb is super simple and quick to make. Loopy chenille has been used to make a variety of craft projects to add a soft and fuzzy texture. Loopy chenille is flexible and can be bent to hold any shape you desire. This loopy chenille lamb can be made for an Easter decoration or even a centerpiece for a special occasion, such as a baby shower!
Things you need:
1 Hank – White Loopy Chenille
1 – 4-3/4″ Styrofoam Egg
1 – 3-3/4″ Styrofoam Egg
1 – Craft Stick
1 – 1/2″ Pink Pom Pom
2 – 2″ Styrofoam Eggs
2 – 3/8″ Dowel Rods
2 – 25mm Googly Eyes
Black Apple Barrel Acrylic Paint
Paint Brush and Accessories
Floral U Pins
Hot Glue Gun
Glue Gun Sticks
Ribbon and Flowers as Desired
Things to do:
1. To start your loopy chenille lamb, take your two 2″ styrofoam eggs and cut them in half. These will later become the little feet of your loopy chenille lamb. Paint all four halves with the Black Apple Barrel acrylic paint. Set aside and let dry.
2. Take your 3-3/4″ styrofoam egg and paint half of the egg black (starting from the smaller point and go half way down). Set aside and let dry.
3. Once your half painted styrofoam egg has dried, press the craft stick half way into one side of the white (unpainted) section of the styrofoam egg.
4. Cut about 15″ of white loopy chenille from your hank. Begin wrapping the entire white (unpainted) section of the half painted styrofoam egg with the white loopy chenille. Secure the loopy chenille with floral u pins and hot glue. This will be the head of your lamb. Be sure to leave the black painted half uncovered. This will be its face.
5. Cut two – 6″ strips of white loopy chenille and bend each strip in half. These will be your lamb’s ears. Pin the ears loopy chenille halves onto the top of your lamb’s head, just behind where the white loopy chenille meets the black styrofoam egg using floral u pins and hot glue. See photo for placement.
6. Wrap the 4-3/4″ styrofoam egg with the white loopy chenille until completely covered. Secure with floral u pins and hot glue as needed.
7. Press the remaining half of the craft stick into the larger styrofoam egg, just behind the smaller end of the egg. Secure the craft stick to the styrofoam egg with a dab of hot glue. Your lamb’s head should now be attached to your lamb’s body.
8. Cut your dowel rods in half, making each rod 6″ in length. Place each half into the four “corners” of your lamb’s loopy chenille covered body. See picture for placement if needed. Secure the dowels with hot glue. Be sure as you add the dowel rods that you are placing them just right, so that your lamb will be sure to stand on its own.
9. Take your small 2″ egg halves that you painted earlier and place them flat side down. Gently press the ends of your dowel rods into the top of your egg halves. Be sure that you do not press to far, or you might ruin the egg halves. Add a dab of hot glue to insure that the little black feet stay in place.
10. Cut four – 7″ strips of white loopy chenille. Wrap each loopy chenille strip along the exposed dowel rod legs. Secure with hot glue as you wrap the loopy chenille.
11. Cut one – 4″ strip of white loopy chenille and bend in half. This will become the lamb’s tail. Secure with floral u pins and hot glue at the end of your lamb’s body. For specific placement refer to photo.
12. Glue on your googly eyes and pink pom pom onto the black section of your lamb’s face. Finally, adorn your lamb with ribbon or flowers of your choice.