Skip to search Skip to navigation menu Skip to main content Selecting option will reload page

Category: General Crafts

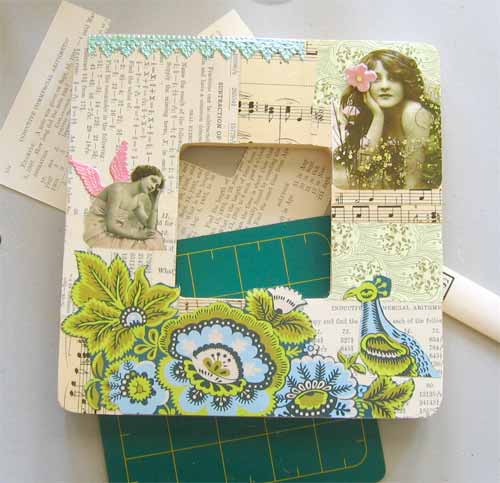
Fun with Mod Podge: How to Decoupage Picture Frames

decoupaged_frame
With a little creativity and a few basic supplies, you can transform plain, inexpensive wooden picture frames into personalized masterpieces. These simple to make decorative frames will grace walls and tabletops in style, and are so easy on the budget that you’ll never hand out school pictures in envelopes or baggies again.

Things you need:
6″ Unfinished Wood Picture Frame
Scrapbook paper
Mod Podge
Wood Stain or Apple Barrel Acrylic Paint
Sand paper
Paint brush
Hobby Knife

Things to do:
1. Paint or stain the back, inside, and outside edge of the frame and allow to thoroughly dry.
2. Coat the front of the frame with an even layer of Mod Podge. Let it set up for 30 seconds or so and then apply a second layer.
3. Lay scrapbook paper on top of the frame and use a rubber kitchen spatula or credit card to smooth out any bubbles.
4. Place the frame face down on top of a cutting mat or cardboard to protect the surface beneath, and use the hobby knife to cut away excess scrapbook paper.
5. Fingertip sand any rough edges. If you’ve sanded away the finish, reapply paint or stain with a paper towel.
6. Apply 2-3 coats of Mod Podge to the surface of the frame, drying 15 minutes between each coat.

While scrapbook paper works great for this project, there’s no reason to limit your selection to stock paper designs. Vintage wallpaper, shelf paper, seed packets, and even pages from old children’s books serve as excellent mediums, and will give your frame a truly unique look.

Whip up a few coordinating wooden hearts, flowers, or stars for a one-of-a-kind photo grouping, or scatter the pieces throughout your decor to create a cohesive theme. Display these decorative masterpieces in your own home, or share them with family and friends. Everyone loves to receive photo gifts, especially when they’re presented in decorative frames!

Photo Credit: Lizzy J Designs

Continue Reading

Flower Tulle Hairbow A Versatile Tool to Dress Up Any Accessory

tulle
Want to add a touch of glam” to flip flops, hairbows, sun hats, lampshades, or just about anything else you can think up? Look no further than these easy to make tulle flowers. With so many beautiful colors to choose from, you’ll be tempted to transform your wardrobe and home into a tulle flower garden.

Things you need:
Tulle
Scissors
Needle and coordinating colored thread
Glue

Things to do:
1. Cut tulle into 3″ x 3″ squares; you’ll need approximately 20 squares to make a nice, fluffy flower.
2. Working with one square at a time, fold the tulle square into fourths and use scissors to round out the edges in the shape of a petal. Repeat to finish all 20 squares.
3. Stack two tulle petals together, leaving them folded in fourths. Use the needle and thread to join the two petals together at their bottom tips. Continue joining petals in stacks of two.
4. Sew the petal bundles together at their tips, rounding out the shape as you go to form a nice, full flower.
5. Use a dab of glue to affix the flower to whatever you’re adorning.

Tulle flowers are terrific for sprucing up summer clothes and accessories, and are ideal for adding a splash of color to your home decor. Whip up a bundle for yourself, or use them to decorate gift items for family and friends. Here are a few fun gift ideas:

  • Decorate flip flops with tulle flowers in your wedding colors, and present them to your bridesmaids to wear to your casual rehearsal dinner
  • Design matching hair accessories or sun hats for your upcoming all girl weekend get away”
  • Make an extra-large (5″ or 6″ square) tulle flower hair accessory using bright apple green and yellow tulle for your friend who’s always losing sight of her little one at the playground
  • Enjoy creating these versatile, beautiful tulle flowers!

    Continue Reading
    Change Your Country
    Please select your country, this will change the site to your country's currency:

    Cancel