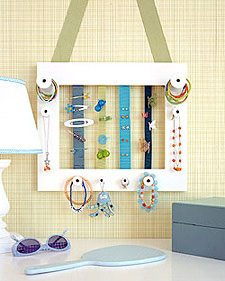
 Tired of searching through a jumble of hair clips and elastics when it’s time to style your child’s hair? With this fun craft, not only will she be able to keep her favorite clips organized and accessible, she’ll also have a colorful piece of art to adorn her wall.
Things you need:
Picture Frame (glass not needed)
Crafter’s Pick The Ultimate Tacky Glue
Wooden Spools
Apple Barrel Acrylic Paint
Embellishments such as charms or buttons
Ribbon
Stapler and Staples
Things to do:
1. Remove glass from frame. Paint frame and spools in child’s choice of color and allow to thoroughly dry.
2. Glue wooden spools to frame, leaving enough space in between for hair elastics to hang without overlapping.
3. Cut ribbon into strips and staple to the back side of frame along top and bottom edge, pulling taut. Leave enough ribbon to overhang the bottom of the frame 18″; cut ribbon at an angle to prevent fraying.
4. Attach a length of 2″ wide ribbon for hanging and finish with decorative embellishments, such as charms or buttons. Secure to the wall in an easy to reach location.
Simple to make, this crafty hair accessory organizer will save loads of time, and tears, by eliminating the need to search for matching elastics and clips. Better yet, when she’s able to pick out her own hair accessories, it will be easier for Daddy to do her hair!
Great for Mom, too, this craft also serves double duty as a safe keeper of earrings, necklaces, and bracelets. To make, either use a glass-free frame, or affix lengths of ribbon and spools to a hanging wall mirror. (To keep your treasures safe from little fingers, hang on the reverse side of a closet or pantry door.)
Make an organizational frame to display in your own home, or present as a Mommy’s Helper” gift to a special mom in your life. With the time you save each morning, you’ll be able to enjoy a second cup of coffee!
