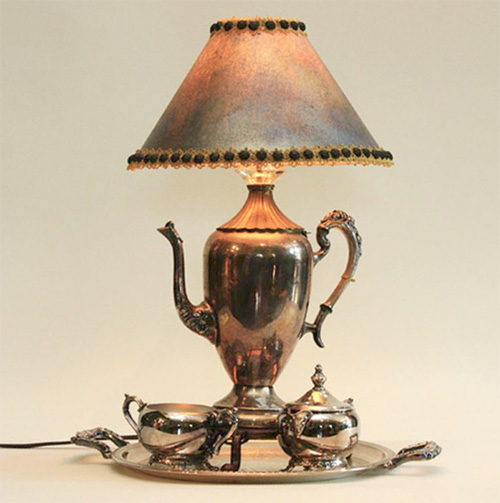
Are you having a hard time finding a lamp that matches your decor? Got an odd piece that you love, but aren’t sure what to do with it and don’t want to get rid of it? How about making it into a lamp? You don’t have to be an electrician or even be handy to build a unique lamp. You can make a lamp out of pretty much anything you would like and they make great conversation pieces!
Things you need:
Lamp Kit
Any object you want to make into a lamp
Lamp Shade
Safety Goggles (optional)
Things to do:
1. First, when you are choosing an object to become your lamp, try to look for an object that already has an opening at the bottom for the wires. If you already have an object in mind and it doesn’t have an open bottom, no worries, you can just drill a small hole using a drill and appropriate drill bit (big enough to create a hole for your wires). If you do not want to drill a hole for the wire or cannot drill it, you can still make the lamp and have the wire run on the outside of it from the socket to the plug. You will also need to choose a matching base (if it doesn’t already have one) so that your object can sit flat with the cord coming out of the bottom. If you are drilling your own hole into the object you can simply just drill a hole on the “backside” of your object instead of the bottom so that you don’t have to worry about finding a base. Be sure when choosing your object that it is strong enough to hold a lampshade and can hold the lamp rod straight. It would also help if you chose your lamp object so that it will fit your lamp rod. No fear again, if you cant find the exact sized object as your lamp rod, you will just have to saw it down to size before you are able to use it.
2. Push your lamp rod into your lamp object and through the bottom of the base so that the rod sticks out a bit. Slide on a washer and screw on a nut so that your rod is held into place. Next, thread your cord through the bottom of the lamp base and up through the top of the lamp. To make threading the cord a bit easier, tape the two wire ends together with a small piece of tape so that the cord will slide easier through the rod. Make sure the end of the plug is coming out of the bottom and that it is not rubbing against the lamp rods sharp edge. Screw on your locknut on top of the lamp rod and make sure the cord is sticking out at least 3″ from the top.
3. You may also need a base for the top of your object depending on if the harp bottom doesn’t fit on the top. If you need need a top base, attach this now and slide the harp bottom onto the lamp rod with the open end facing up. Do the same thing for the socket cap. Make sure that both the harp bottom and socket cap are securely tightened.
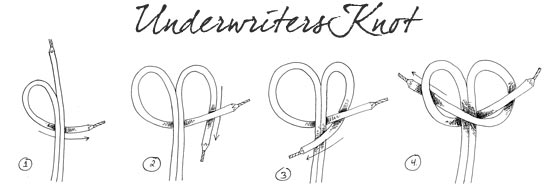
4. Pull the two ends of the cord about 2″ apart from each other. Tie the two ends of the cord in a underwriters knot*, this will prevent the wire from slipping back through the lamp rod. Next, you will want to determine which wire is the hot wire and which is the neutral wire. The neutral wire is generally ribbed on the insulation. Securely wrap the neutral wire around the silver screw on the bulb socket and the hot wire around the gold screw. Tighten the screws and make sure that the wires are tightly attached underneath them.
5. Place the socket shell over the bulb socket and tuck the cords inside so that they wont be visible. Squeeze the ends of the harp and slide them into the slots of the harp bottom. Once the harp is on you can screw in a light bulb and add your lampshade. Voila! You now have a one of a kind lamp!
Project Notes:
*An underwriters knot is pretty simple. Just make a “y” shape, then curl the wires down and back towards each other. Then the pull the ends through the created loops.

Keep in mind that wiring electrical circuits carries some risk. If the wiring is not correct, you can be shocked, electrocuted or the device can cause a fire. If you are not too sure what you’re doing or are a bit apprehensive about doing this project then just simply get the object prepared all the way up to the wiring part and have someone else that is more skilled in electrical wiring actually wire up the lamp.
Before you do ANY wiring make sure that you the lamp is unplugged and that you have checked your wiring a couple of times.
It is also important to ensure light bulb is not too close to any surface including any wiring and decorative aspects of the lamp. Always leave spacing from the light bulb and other materials which can cause burning and damaging.
1 Comment