Things you need:
10″ Round Styrofoam Disk
5″ Styrofoam Ball
4″ Styrofoam Ball
Sparkling Orange “Happy Halloween”
2″ x 3″ Styrofoam Cone
Black Jumbo Loopy Chenille
2- 1-1/2″ Black Craft Pom Poms
9″ x 12″ Pink Felt Square
1/2″ Orange Craft Pom Poms
7/8″ Unfinished Split Wooden Eggs
1-1/2″ Orange Organza Ribbon
3 – 3-15/16″ Unfinished Wooden Pear
2 – 5mm Googly Eyes
9″ x 12″ Gray Felt Square
1 – 1/2″ Black Craft Pom Poms
Dolphin Grey Apple Barrel Acrylic Paint
Green Clover Apple Barrel Acrylic PaintBlack Apple Barrel Acrylic Paint
Lemon Chiffon Apple Barrel Acrylic Paint
Orange Apple Barrel Acrylic Paint
1 – 3″ Unfinished Wooden Sign
1 – 5/16″ x 12″ Dowel Rods
24″ Long Natural Grapevine Twig Vine Swag
14″ Lotus Pod and Berry Floral Pick
1-1/4″ Primitive Wood Stars
26 Gauge Green Stem Floral Wire
Meadow Green Apple Barrel Acrylic Paint
1-3/4″ Floral U Pins
Things to do:
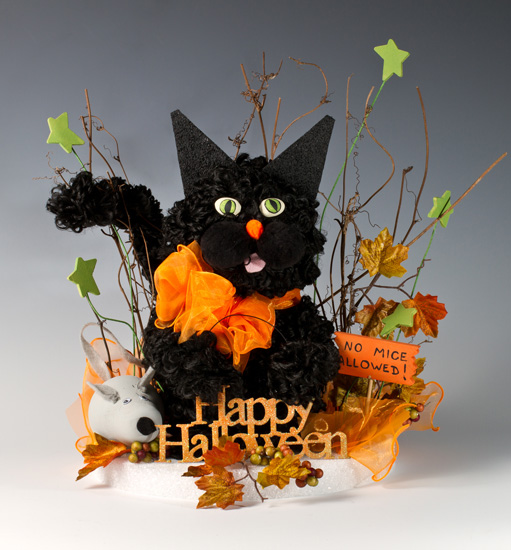
1. Starting off with the cat, Take the two styrofoam balls and glue together (5″ styrofoam ball for the body and the 4″ styrofoam ball for the face). Take the black loopy and pin at the bottom of the 5″ styrofoam ball and start wraping around both balls, make sure it’s tight and no white showing from styrofoam. Use pins to keep loopy in place around the styrofoam. After getting both wrapped good, cut 2 pieces of the left over loopy that are 9″ long for the arms. Fold them both in half and twist ends together for each and then pin into the side of the top 5″ ball. Cut another 2 piece from loopy that are 6″ long for the feet, fold in half and twist ends together to both pieces and pin into the bottom of 5″ styrofoam ball. For the tail cut 20″ off of the black loopy, fold in half, twist together, and pin into the back at the bottom of the 5″ styrofoam ball.
2. Glue the cat to the 10″ round styrofoam disc in the middle. Cut styrofoam cone in half and paint both pieces black. Glue each half on top of 4″ styrofoam ball for the ears. Take two pieces of the wooden split egg and paint them both with the lemon paint, draw on a black circle on both split eggs, green paint in the middle and then use black paint for the center of eye. Glue eyes onto the face after paint has dried. Take a orange pom pom and glue on for the nose and glue one black pom pom
on each side of the nose. Cut a piece out of the pink felt for the tongue and glue in between the two black pom poms.
3. Cut 2 pieces of the orange ribbon that is about 20″ long, put both together and tie a bow around the cats neck. Glue the “Happy Halloween” sign in the hands of cat.
4. Next we will start with the mouse. Take the wooden pear and paint that with the dolphin Grey paint. Cut out 2 circles from the Grey felt that are 1″x1″ and glue that on top of pear where the bigger part starts out. Glue on two googly eyes and take one of the 1/2″ black pom pom and glue to the tip of the pear for the nose. Cut a 6″ pieces from Grey felt for the mouse’s tail. Glue to the left side of the cat on the styrofoam disc.
5. Grab the wooden sign and paint with the orange paint, then write “NO MICE ALLOWED” with black paint. Cut a 3″ piece off the dowel rod and glue to the sign and glue into the styrofoam disc on right side.
6. Take the 24″ long natural grapevine twig vine swag, stick and glue into the styrofoam disc around the back of the cat. Place where ever you desire and put how ever many you would like.
7. Take 5 or 6 wooden stars and paint them green. After they dry, glue the 26 gauge green stem to the stars. Make each stem different sizes and place to your liking. Glue stems into Styrofoam disc to keep in place.
8. Lastly, take the berry floral pick and arrange them how ever you would like, Try separating the pieces and glue them onto the styrofoam disc. Cut 7 pieces off the orange ribbon. Take each piece and bunch together, then pin into the styrofoam disc around the sides and in the back of disc.
2 Comments
Does this “No Mice Allowed Loopy Chenille Halloween Cat” come in a kit with all the materials and instructions? I’d love to make this.
Thanks!
Millie
Millie, Im glad you like our project! Unfortunately this does not come in a kit, but if you look under the “things you need” section of this project, you can click on each item and it will bring you to our website with that specific item, just simply add to your cart (do this to each item under that section)! The instructions are on this blog post, you can just print this page from your computer, or if it would be easier we could send you an email and you can print that out. Just let me know which is easiest for you! If you have any problems or questions please dont hesitate to ask!